10 DIY Flower Crafts to Brighten Your Home
Fresh flowers have an undeniable charm. They bring life, color, and a sense of happiness into any space. But did you know that flowers aren’t just for vases? They are a perfect medium for creative projects too.
DIY flower crafts elevate your home decor, allowing you to showcase your style and create something truly unique. With a bit of imagination and a few simple materials, you can turn blossoms into stunning floral decor that speaks to your personality.
These DIY flower projects are more than just a fun pastime; they're a chance to bring nature indoors in exciting and unexpected ways. Whether you’re crafting for a special occasion like a wedding or simply want to add some everyday cheer to your home, flowers offer endless possibilities. And the best part? You don't always need green thumbs to succeed! With the right guidance and inspiration, anyone can create something beautiful with flowers.
Flowers are also incredibly versatile. From pressed flower art to floral arrangements that last weeks, there’s a craft for every season and reason. Spring calls for bright, playful designs, while autumn lends itself to rich, earthy tones. Whatever the time of year, a flower craft can set the mood in your home and delight anyone who visits.
For those who love flowers but don’t always have the time to keep fresh ones on hand, working on flower crafts is a great alternative. It gives you the chance to enjoy the timeless beauty of blooms without worrying about them wilting too soon. Some flower crafts even use preserved or faux flowers, extending their charm indefinitely. The result? A cozy, nature-inspired home that feels warm and welcoming year-round.
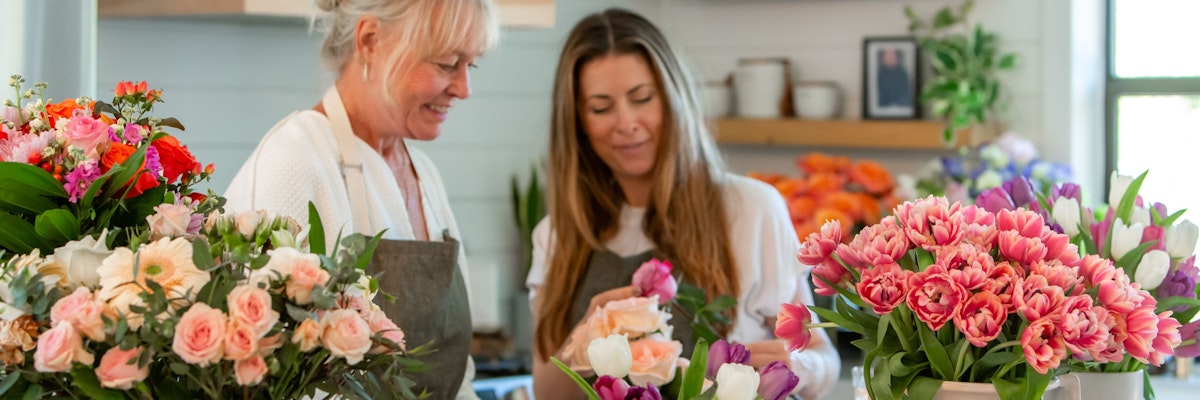
You may be wondering where to source flowers for these projects. BloomsyBox is an excellent option to consider. Known for their beautiful, fresh blooms delivered directly to your door, BloomsyBox provides the perfect starting point for any floral decor project. Their curated collections ensure you’ll always have high-quality flowers ideal for crafting, whether you need lush roses, vibrant sunflowers, or delicate lilies.
The therapeutic benefits of flower crafts shouldn’t be underestimated either. The act of arranging flowers, designing patterns, or gluing petals is a calming and mindful experience. It allows you to slow down, focus on the details, and take pride in creating something with your hands. Plus, the end result is always uplifting. Every time you walk by your completed project, you’ll feel a sense of accomplishment and joy.
This post will guide you through 10 incredible DIY flower crafts you can try at home. Each craft combines creativity with practical tips, ensuring that every level of experience is catered to. Whether you’re a crafting beginner or a seasoned pro, there’s a project here for you. Get ready to transform your home one petal at a time, and discover how flowers can brighten your space in ways you’ve never imagined.
Elegant Flower Candle Holders
If you’re looking for a way to combine the warmth of candlelight with the beauty of blooms, flower candle holders are a perfect choice. These delightful crafts add a touch of floral decor to centerpieces, mantels, or even outdoor spaces. Start by selecting flowers that complement your candles, such as roses, daisies, or baby’s breath. Faux flowers also work well for this project as they’re heat-safe and long-lasting.
To begin your flower candle holder, you’ll need some basic supplies like a plain candle holder or jar, a hot glue gun, and decorative accents like ribbons or beads. First, clean your chosen base to remove any dust. Then, start arranging your flowers around the base, testing placements until you achieve a pleasing design. Once you're satisfied, secure each flower with hot glue, ensuring they’re firmly attached.
A layered look often creates the most stunning results. Begin with a base layer of greenery or larger blooms and gradually add smaller flowers. This process mimics natural floral arrangements and creates depth. To enhance the look further, wrap the holder in twine or lace for a charming, rustic touch.
Safety is crucial when working on crafts that involve candles. Keep flowers away from the candle’s flame to avoid accidents. For a safer option, consider using flameless LED candles, which offer the same cozy vibe without the fire hazard. These are especially handy if you want to use fresh or dried flowers.
Personalize your candle holders to match specific occasions. For a romantic dinner, opt for red roses and elegant white accents. Winter holidays can inspire creations with pine branches and frosted faux flowers. Themed designs not only make your decor striking but also add festive flair to your home.
These DIY flower projects can even double as thoughtful gifts. When paired with a gorgeous candle, a flower-embellished holder becomes a heartfelt token for loved ones. Wrap your creation in a cellophane bag with a ribbon for an added touch of elegance, making it perfect as a hostess or holiday gift.
Creating flower candle holders is as rewarding as it is beautiful. Whether you’re a seasoned crafter or new to DIY flower projects, this craft is easy to make yet leaves a lasting impression. Enjoy the glow of your floral decor and marvel at how an ordinary candleholder can transform into an extraordinary centerpiece.
DIY flower crafts elevate your home decor, allowing you to showcase your style and create something truly unique. With a bit of imagination and a few simple materials, you can turn blossoms into stunning floral decor that speaks to your personality.
These DIY flower projects are more than just a fun pastime; they're a chance to bring nature indoors in exciting and unexpected ways. Whether you’re crafting for a special occasion like a wedding or simply want to add some everyday cheer to your home, flowers offer endless possibilities. And the best part? You don't always need green thumbs to succeed! With the right guidance and inspiration, anyone can create something beautiful with flowers.
Flowers are also incredibly versatile. From pressed flower art to floral arrangements that last weeks, there’s a craft for every season and reason. Spring calls for bright, playful designs, while autumn lends itself to rich, earthy tones. Whatever the time of year, a flower craft can set the mood in your home and delight anyone who visits.
For those who love flowers but don’t always have the time to keep fresh ones on hand, working on flower crafts is a great alternative. It gives you the chance to enjoy the timeless beauty of blooms without worrying about them wilting too soon. Some flower crafts even use preserved or faux flowers, extending their charm indefinitely. The result? A cozy, nature-inspired home that feels warm and welcoming year-round.
You may be wondering where to source flowers for these projects. BloomsyBox is an excellent option to consider. Known for their beautiful, fresh blooms delivered directly to your door, BloomsyBox provides the perfect starting point for any floral decor project. Their curated collections ensure you’ll always have high-quality flowers ideal for crafting, whether you need lush roses, vibrant sunflowers, or delicate lilies.
The therapeutic benefits of flower crafts shouldn’t be underestimated either. The act of arranging flowers, designing patterns, or gluing petals is a calming and mindful experience. It allows you to slow down, focus on the details, and take pride in creating something with your hands. Plus, the end result is always uplifting. Every time you walk by your completed project, you’ll feel a sense of accomplishment and joy.
This post will guide you through 10 incredible DIY flower crafts you can try at home. Each craft combines creativity with practical tips, ensuring that every level of experience is catered to. Whether you’re a crafting beginner or a seasoned pro, there’s a project here for you. Get ready to transform your home one petal at a time, and discover how flowers can brighten your space in ways you’ve never imagined.
Elegant Flower Candle Holders
If you’re looking for a way to combine the warmth of candlelight with the beauty of blooms, flower candle holders are a perfect choice. These delightful crafts add a touch of floral decor to centerpieces, mantels, or even outdoor spaces. Start by selecting flowers that complement your candles, such as roses, daisies, or baby’s breath. Faux flowers also work well for this project as they’re heat-safe and long-lasting.
To begin your flower candle holder, you’ll need some basic supplies like a plain candle holder or jar, a hot glue gun, and decorative accents like ribbons or beads. First, clean your chosen base to remove any dust. Then, start arranging your flowers around the base, testing placements until you achieve a pleasing design. Once you're satisfied, secure each flower with hot glue, ensuring they’re firmly attached.
A layered look often creates the most stunning results. Begin with a base layer of greenery or larger blooms and gradually add smaller flowers. This process mimics natural floral arrangements and creates depth. To enhance the look further, wrap the holder in twine or lace for a charming, rustic touch.
Safety is crucial when working on crafts that involve candles. Keep flowers away from the candle’s flame to avoid accidents. For a safer option, consider using flameless LED candles, which offer the same cozy vibe without the fire hazard. These are especially handy if you want to use fresh or dried flowers.
Personalize your candle holders to match specific occasions. For a romantic dinner, opt for red roses and elegant white accents. Winter holidays can inspire creations with pine branches and frosted faux flowers. Themed designs not only make your decor striking but also add festive flair to your home.
These DIY flower projects can even double as thoughtful gifts. When paired with a gorgeous candle, a flower-embellished holder becomes a heartfelt token for loved ones. Wrap your creation in a cellophane bag with a ribbon for an added touch of elegance, making it perfect as a hostess or holiday gift.
Creating flower candle holders is as rewarding as it is beautiful. Whether you’re a seasoned crafter or new to DIY flower projects, this craft is easy to make yet leaves a lasting impression. Enjoy the glow of your floral decor and marvel at how an ordinary candleholder can transform into an extraordinary centerpiece.

Vibrant Flower Crowns
Flower crowns aren’t just for festivals; they’re a versatile and delightful craft that can add flair to weddings, photo shoots, or simply a fun afternoon tea party. With a whimsical quality that resonates with all ages, this floral decor can bring an ethereal touch to any event. Making your flower crown at home ensures it’s as unique as you are.
To create your flower crown, begin with an adjustable base such as floral wire or a soft headband. Measure the circumference of your head to ensure a comfortable fit. Next, gather flowers and greenery that suit the occasion. Smaller blooms, like daisies and baby’s breath, work well to create a delicate look, while larger flowers like ranunculus add drama.
Start by wrapping your base with greenery. This step sets the stage for layering your flowers. Use floral tape or wire to secure each piece, being careful not to snag or crush the blooms. The key is to layer your flowers evenly around the crown for a balanced look. Alternating between large and small blooms adds both texture and visual interest.
For a boho-chic vibe, add trailing elements like ivy or ribbons that cascade down the back. This touch is particularly popular for bridal flower crowns or outdoor events. Pastel hues evoke soft elegance, while bright, bold colors are perfect for summer festivals or parties.
Flower crowns are as practical as they are beautiful. They can elevate your attire for special occasions like baby showers, engagement parties, or even casual garden picnics. The charm lies in their versatility and how effortlessly they blend with different outfits and themes.
Fresh crowns should be made on the same day they’ll be worn to maintain their vibrancy. If you’re seeking a longer-lasting option, use faux or dried flowers. These versions look equally stunning and can be reused multiple times, making them a great choice for those who regularly attend events or love photography sessions.
Crafting your own flower crown is an empowering experience. It allows you to wear your creativity literally on your head, showcasing your unique style and flair. Whether you’re donning it for a special day or just because, a flower crown is bound to leave you feeling like royalty.
Upcycled Flower-Adorned Mason Jars
Mason jars find new life when paired with flowers. This craft is perfect for those who love upcycling everyday items into charming DIY flower projects. These flower-adorned jars can serve as planters, vases, or outdoor lanterns, blending practicality with aesthetic appeal. With a little effort, you can turn simple jars into eye-catching floral decor pieces.
Begin by selecting a mason jar and cleaning it thoroughly. Decide on the finish you’d like for the jar. Clear jars allow flowers to shine through beautifully, but you can also paint or frost the jar for a unique touch. Chalk paint works wonderfully for a rustic, shabby-chic effect.
Once your jar is prepped, the fun begins. Wrap twine or lace around the neck of the jar, securing it with a dab of glue. Attach faux or dried flowers around the top rim for a finished look. Flowers like faux lavender stems or tiny roses work best because they’re easy to arrange and adhere well.
If you’re looking to use these jars as light fixtures, add fairy lights inside for an enchanting glow. Fresh flowers can also be placed inside, with a bit of water at the bottom for hydration. These are excellent choices for table centerpieces at events or as casual home decor that creates an inviting atmosphere.
To take the design a step further, experiment with seasonal accents. For spring and summer, bright flowers like daisies and tulips feel light and airy. Autumn jars can feature warm-colored blooms, complemented by berries or small pinecones, creating a cozy vibe.
One exciting aspect of this project is its eco-friendly nature. By repurposing old jars, you’re reducing waste while crafting something beautiful. This is ideal for sustainability-conscious creators who value the art of upcycling.
Flower jars are also budget-friendly. You can use blooms leftover from other projects or source inexpensive faux flowers readily available in craft stores. This affordability means you can whip up multiple jars without breaking the bank, offering a cohesive look to your floral decor.
Regardless of how you choose to adorn them, mason jars paired with flowers provide endless creative possibilities. Their ability to blend functionality with beauty makes them a staple for DIY flower enthusiasts. They add a rustic edge to any setting and are a testament to how small, thoughtful details can transform ordinary objects.


Custom Floral Photo Frames
Photo frames play an essential role in preserving memories, and adding flowers to them takes their charm to the next level. A floral photo frame can serve as a heartfelt gift or a decorative accent for your walls or tabletops. This simple yet impactful project combines creativity and nostalgia into one delightful DIY flower project.
To make your floral photo frame, start by choosing a plain frame made of wood, plastic, or even cardboard. Lightly sand wooden frames to ensure smooth adhesion if needed. Next, gather your flowers. Faux flowers work best for longevity, but you can also use dried blooms for a rustic and natural effect. Small flowers, such as daisies and tiny roses, are ideal for avoiding a cluttered appearance.
Decorating your frame begins with planning the layout of your flowers. Arrange them around the corners or edges, creating a balanced composition. Once you’re satisfied with the placement, use a hot glue gun to firmly attach each flower to the frame. Be sure to work slowly and carefully to maintain the arrangement’s design.
To add dimension, mix in greenery or additional decorative elements like pearls, ribbons, or beads. Pairing flowers with contrasting materials ensures your frame catches the eye. For instance, a vintage look can be achieved by combining delicate forget-me-nots with lace or burlap accents.
If you’re creating a gift, consider personalizing the frame. Add initials, dates, or small mementos along with the flowers to make it extra special. For example, a floral photo frame for a wedding gift could feature the couple’s favorite flowers paired with their initials elegantly displayed on a corner.
Floral photo frames also make fantastic seasonal decor. Use vibrant, sunny blooms like yellow marigolds and sunflowers during the summer months. For winter, incorporate icy shades of blue and white flowers for a frosty yet inviting effect. The versatility of this craft means you can switch up your designs as the seasons change.
One of the best aspects of this project is how beginner-friendly it is. No matter your crafting skill level, this floral decor idea is easy to execute and offers stunning results. It’s also budget-friendly since you can use inexpensive, readily available materials.
Ultimately, this DIY flower project pairs functionality with beauty. By mixing photos with flowers, you’re not just creating decor but also enhancing cherished memories. Display it prominently and relish the joy it brings to your space, capturing special moments in bloom.
Charming Mini Flower Bouquets
Mini flower bouquets are a delightful way to pack a big punch in small packages. Whether for gifting, table settings, or casual accents around the house, these tiny bundles of floral joy exude charm. They’re perfect for those moments when you want to add just a touch of flower power without committing to a full arrangement.
Begin with small flowers like baby’s breath, miniature spray roses, or lavender. These work well due to their size and delicate beauty. Use greenery such as fern leaves, eucalyptus, or even sprigs of herbs for additional texture and scent. You’ll also need floral tape, twine, and scissors to assemble the bouquets.
Start by selecting three to five smaller flowers and arrange them in your hand. Blend in greenery to create balance. Once satisfied with the look, wrap the stems snugly using floral tape. This ensures the bouquet maintains its shape while keeping the stems neat and bound together.
To give the bouquet a finished look, wrap the floral tape with some twine or a thin ribbon. Knot it securely, letting the ends trail slightly for a rustic feel. Ribbons in pastel hues often work well for weddings or baby showers, while burlap or jute twine pair beautifully with rustic themes.
Mini bouquets aren’t just decorative; they’re highly functional too. Use them as wedding or party favors by attaching a small tag with each guest’s name. They become both a seating placeholder and a keepsake they can take home. Another fun idea is to tuck them into napkins as part of a table setting for a special dinner.
Seasonal variations can elevate their appeal even further. Spring-inspired bouquets could feature cherry blossoms and pastel tulips. For autumn, rich hues like burnt orange marigolds with golden wheat stems create a cozy atmosphere. Switch up your floral choices and styles to match any occasion or season.
To keep fresh flowers vibrant longer, trim their stems at an angle and refrigerate the bouquets until you’re ready to use them. Alternatively, dried or faux flowers eliminate the need for upkeep, making the mini bouquets last indefinitely and providing a charming touch year-round.
This DIY flower project is about offering thoughtful, small gestures that leave a big impression. Whether placed on shelves, gifted to friends, or used as decor for events, mini bouquets radiate warmth and creativity. Start experimenting with this craft, and enjoy creating countless tiny masterpieces.
Dried Flower Resin Coasters
For a craft that combines functionality with artistic flair, dried flower resin coasters make an excellent choice. These coasters are like miniature works of art, capturing the beauty of blooms in a permanent, clear surface. They’re perfect as gifts, home additions, or even conversation starters at dinner parties.
The first step is selecting your flowers. Dried flowers work best for this project, as their low moisture content prevents bubbling in the resin. Pressed flowers such as pansies, hydrangea petals, and ferns create visually stunning results due to their flatness and detailed features. Arrange your chosen flowers on a clean surface before starting.
You’ll need a resin kit, a small silicone coaster mold, and safety gloves. Mix the resin according to the manufacturer’s instructions, ensuring you work in a well-ventilated area. Pour a small layer of resin into each mold, allowing it to partially set for about 5–10 minutes.
Carefully place your flowers onto the partially set resin, using tweezers for precise placement. Arrange the blooms in patterns or clusters that appeal to you. Once satisfied, pour the remaining resin over the flowers slowly to avoid trapping air bubbles. Ensure the flowers are fully submerged and evenly covered.
To enhance the design, consider adding metallic flakes, bits of gold leaf, or a sprinkle of glitter. These elements complement the flowers and make the coasters sparkle, especially under light. Leave the resin to cure for 24–48 hours, depending on the product’s specifications.
Once hardened, pop the coasters out of the molds and sand down any rough edges for a smooth finish. Wipe them clean, and your stunning floral decor is ready to use or gift. These coasters not only protect your tables but also serve as functional art pieces.
The beauty of this craft lies in its customization. Use flowers that reflect your personality or match your home’s color palette. Additionally, resin coasters make fantastic handmade gifts for loved ones. Pair them with a bottle of wine or a handcrafted mug to create a thoughtful present set.
Resin crafts like these showcase the timeless appeal of flowers in a modern, practical way. Every time you use one of these coasters, you’ll be reminded of the beauty in preserving nature’s fleeting moments. Try your hand at this project and enjoy the admiration your creations will undoubtedly garner.
Personalized Flower Bookmarks
For book lovers and craft enthusiasts alike, floral bookmarks offer a way to enjoy the beauty of flowers while marking your favorite pages. Combining practicality with delicate aesthetics, this project is an ideal beginner-friendly craft that delivers charming results. These bookmarks also make thoughtful gifts or party favors that show a personal touch.
Start with pressed flowers, as their flat and dried nature works best for this craft. Choose blooms like pansies, buttercups, or violets for their vibrant colors and intricate shapes. You’ll also need thick cardstock, clear laminate sheets, scissors, and a hole punch if you plan to add a tassel.
Begin by cutting the cardstock into rectangular shapes, about the size of a standard bookmark. Arrange the pressed flowers on the paper without gluing them at first, experimenting with different layouts until you find one you like. Once satisfied, use small dots of glue to attach the flowers securely.
Seal the flowers using clear laminate sheets. Place your decorated cardstock between two laminate layers and press down firmly. This protective layer ensures your pressed flower design remains intact over time and gives the bookmark a polished, professional appearance.
To elevate the design, punch a hole at the top of the bookmark and thread a ribbon or tassel through it. Mix and match colors to complement the flowers, adding a stylish flair to your creation. Tassels, in particular, add an element of sophistication, making your craft even more captivating.
Floral bookmarks can be tailored to any theme or occasion. Bright, colorful blooms are perfect for summer, while muted or darker tones pair beautifully with cozy, fall-inspired aesthetics. Have fun experimenting with different flower types and designs to keep things fresh and exciting.
This craft is also a wonderful way to preserve sentimental flowers. Use petals or leaves from bouquets gifted by special people or collected during memorable events. Every time you open your book, you'll be reminded of that cherished moment, making your reading experience all the more enjoyable.
Whether for personal use, presents, or even as party favors, flower bookmarks are easy to make yet incredibly meaningful. They bring a little extra joy to your reading sessions and are a beautiful way to carry the serenity of flowers wherever you go.


Decorative Flower Lanterns
Flower lanterns combine the enchantment of soft lighting with the natural charm of blooms, making them a standout piece for any room. This magical DIY flower project is perfect for enhancing outdoor spaces like patios or adding an ethereal mood to indoor corners. These lanterns also make wonderful centerpieces for events such as weddings or garden parties.
To create your flower lantern, select a clear jar or lantern as the base. Mason jars, tall glass vases, or small lantern frames work well, depending on the scale of your project. Use faux or dried flowers to guarantee a long-lasting decoration, paired with fairy lights for illumination.
Start by placing a string of fairy lights inside the jar. Spread them evenly to ensure the lantern glows beautifully from every angle. If you’re using a frame-style lantern, attach the lights around the edges or frame using clear adhesive dots or floral wire.
Next, arrange your flowers inside the jar or around its exterior. Delicate blooms like baby’s breath, lavender, and small roses create a softer, more cohesive look. Faux greenery can also be added to enhance texture and fill empty spaces. Secure the flowers as needed with adhesive glue.
Wrapping a strip of lace or burlap around the jar’s rim adds elegance and hides any unfinished edges. For extra charm, attach a small bow or dangling trinket to the front of the lantern. These little details give your craft a polished, thoughtful appearance.
Display your flower lanterns in places that benefit from soft, ambient light. They work exceptionally well on fireplace mantels, nightstands, or as table centerpieces. For larger gatherings, line a pathway with several flower lanterns to create a warm, welcoming atmosphere for your guests.
For seasonal modifications, adapt the color scheme of the flowers and lights. Autumn tones like burnt orange and gold work beautifully in the fall, while winter whites and icy blues evoke a festive, snowy theme. This flexibility allows you to use flower lanterns all year round.
These lanterns are not only visually stunning but also functional. They brighten up dark areas without overwhelming the space, offering a cozy and refined touch. Creating them is easy and rewarding, leaving you with a craft that transforms ordinary spaces into magical retreats.
Stunning Floral Tote Bags
Floral tote bags are the perfect blend of utility and style. Using flower crafts to decorate fabric purses allows you to carry a piece of art wherever you go. From sprucing up an old tote to personalizing a new one, this DIY flower project is all about giving everyday items a creative flair.
Start with a plain canvas tote bag as your base. You’ll need fabric paint, stencils, and brushes for a painted design, or pre-made floral applique patches if you’re opting for a no-paint option. Your selection of flowers should align with your favorite colors or reflect the season.
If painting flowers onto your tote, create a design outline first using a stencil or by lightly sketching with chalk. Once the outline is ready, use fabric paints to fill in the flower designs. Vibrant reds, yellows, and greens can make the design pop, while pastels create a softer, more elegant visual.
For a quicker approach, use applique flower patches. These can be ironed or sewn onto the tote bag for instant decoration. Combine different patches for a mix-and-match look, creating unique flower arrangements across your bag. Add in greenery patches for extra texture.
Consider embellishing the bag further with faux gems, beads, or pearls around the flowers. This step adds a sophisticated feel while drawing attention to your meticulously crafted design. Be sure that any additional elements are sealed or sewn on firmly for durability.
Floral tote bags are as versatile in style as they are in use. Smaller flower designs work well for an understated everyday bag, while bold, colorful arrangements make statement pieces perfect for summer outings or beach trips. You can even create themed bags, such as autumn leaves and flowers, to celebrate the changing seasons.
Maintaining your floral tote is simple if you use the right materials. Painted designs should be heat-set with an iron to ensure they’re machine washable. For applique designs, choose durable, washable patches that can withstand regular use.
With this craft, you transform the mundane into the extraordinary. A floral tote bag isn’t just a practical item; it becomes an extension of your personality. Whether you’re running errands or heading to the beach, your custom creation will turn heads and inspire compliments.

Blooming Gift Wrappings
Why settle for ordinary gift wrap when you can create stunning floral presentations? Wrapping gifts with flowers not only looks beautiful but also shows extra thought and care. This DIY flower project is a wonderful way to make your presents stand out for birthdays, weddings, or any memorable occasion.
Select natural kraft paper, solid-colored wrapping paper, or even fabric as your gift wrap base. The simple backdrop ensures your flowers take center stage. Choose flowers like delicate sprigs of lavender, roses, or carnations, and pair them with greenery for a refined, organic appearance.
Wrap your gift as you normally would, securing the paper or fabric neatly around the box. Once wrapped, arrange your flowers and greenery on top of the package. Play around with layouts to find the best configuration, balancing colors and textures.
Secure the blooms using clear tape, floral wire, or even a small bow. For eco-conscious wrapping, skip the tape and tie everything together with twine or jute. Not only does this method avoid waste, but it also gives your gift a lovely rustic vibe.
Enhance flower-wrapped gifts with additional details. Attach handwritten tags or cards featuring floral designs to complement the theme. You could even sprinkle some dried flower petals within the wrapping for a pleasant surprise when the gift is opened.
Floral wrapping works for any celebration. Add poinsettias and holly for Christmas gifts, cheery sunflowers for summer birthdays, or pastel roses for baby showers. Make small adjustments based on the flowers available to create a cohesive and meaningful presentation.
For perishable flowers, assemble your gift wrap shortly before presenting, or use faux flowers for a longer-lasting alternative that your recipient can keep as a memento. Both options look equally spectacular and will leave a lasting impression.
Wrapping gifts with flowers showcases creativity and thoughtfulness. It elevates your present into a one-of-a-kind offering that recipients will admire even before they open it. With minimal effort and lots of charm, this craft transforms gifting into an art form all its own.
DIY flower crafts are a breath of fresh air in home decor projects. They allow you to harness the natural beauty of blooms and create something that is not only visually appealing but also deeply personal. From delicate resin coasters to show-stopping floral wreaths, there's truly a craft for everyone. These projects offer an engaging way to personalize your space, combining nature with creativity.
What makes DIY flowers so enjoyable is their versatility. You can use fresh flowers for a vibrant, natural touch or turn to faux and dried options for designs that last. The joy of designing and crafting these projects only adds to the satisfaction of seeing them brighten your home daily. Whether you’re planning a big event or updating a cozy corner, incorporating flowers into your creations guarantees a more inviting and cheerful space.
BloomsyBox.com emerges as an invaluable partner in these crafting journeys. They deliver fresh, high-quality flowers that are perfect for any DIY flower project. Their wide selection means you’re always equipped to create stunning floral decor, no matter your chosen style or theme. For inspiration and fresh blooms to kickstart your crafts, you can click here and explore their offerings in detail.
Another advantage of working with flowers is the therapeutic, calming effect they have. Creating something with your hands while surrounded by their fragrant beauty is an experience like no other. Your finished project becomes a testimony to your skills and your eye for design. It’s fulfilling, relaxing, and, importantly, a reminder that nature always has something to offer.
Whether you’re crafting for a specific occasion or simply to indulge your creative side, flower projects never fail to bring joy. The combination of textures, colors, and fragrances is unmatched, providing an enchanting way to transform ordinary items into extraordinary decor.
If you're ready to explore the endless possibilities offered by flowers, there’s no better time to start than now. A few materials, some guidance, and a hint of imagination are all you need to create something magical. Visit BloomsyBox.com today, and take the first step toward mastering the art of DIY flower decor.
With each petal and leaf painstakingly arranged, you’ll rediscover the beauty of creativity. Your home will serve as a reflection of your love for nature and your ability to bring it indoors in wonderful and surprising ways. Get started, and enjoy the bright, refreshing transformation flowers can bring to your life!